Sunday, September 5, 2010

Once a month doesn't cut it!

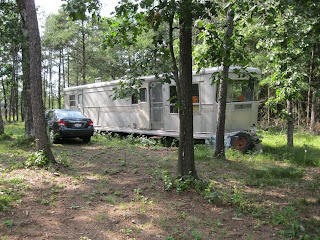
Now that the hot summer days are winding down I need to get going with my restoration of the Spartan. The good news is it did not smell as bad today as the last time I was there.

I really needed to get the floor sealed up to keep out the local small animal population. I guess removing the rotted floor pieces removed most of the smell along with it. Today I started replacing the plywood with new 3/4 inch plywood which will act as the base for the luann that will cover the entire floor and should act as a smooth base for my tile.

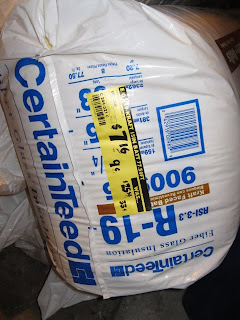
I am using R13 insulation under the floor and in the ceiling. Hopefully this will keep things nice and warm in the winter and cool in the summer.
Forgot to cut the hole for the floor duct! D'oh!
It looks like I will need to cut out more of the floor and replace it because of the wood bracing under it is rotted. I can't wait until the entire floor is solid and tiled!

I am not a big fan of the laminate in the kitchen it's worn and mainly white. I thought this was from the 50's?? White?? Come on! I have a sample of boomerang laminate from Menards in a blue color that would be cool. They quoted me $72.00 for a 4x8 sheet...Can this be right? Anyway, the piece behind the stove seemed loose so I unscrewed the screws and it came right off. Amazing no liquid nail stuff under it! I'm adding a few new outside shots I took today, boy the grass is growing!
She needs to be leveled!

Friday, August 6, 2010

Starting on the floor repair

So I finally got up to the trailer last weekend and brought along a truck load of crap. I was only able to bring some of my insulation I purchased last week since I loaded the truck with other stuff including my new bathroom sink and a sheet of 3/4 plywood.

I was really excited about the sink since the size was sorta odd. I dragged the sink out of my truck and plopped it into the hole in the vanity. PERFECT fit!!! Once I put a chrome faucet on it and clean the rest of the bath it should look great. The green color of the sink should match the pink and black of the rest of the bath.


I had to cut out a bit more of the floor and clean up the cuts I made previously. Most of the old screws were rusted to the steel frame or rusted to a point. I pounded them down which released them then simply pulled them out.

 The 3/4" floor is sitting on steel frame rails that have 3/4" x 4" nailing rails on top of the steel. I cut new rails and glued them down with liquid nail sub floor adhesive. I will reinforce them the next time I'm there. I can tell I will need at least another 4x8 piece of plywood to fill the holes in the living room. All of this will then be covered with a thin sub floor so I can tile it.

I decided to remove the bathroom toilet since I discovered it was cracked across the bowl. The bolts were so rusted I had to break the tank with a hammer to get it out of the bathroom. The entire floor of the bath will need to be replaced since it is as bad as the parts of the floor I removed in the living area.

I decided to also take down the cabinet in the kitchen so I could attempt to take it home. I got it down but no such luck taking it home. Now I will be able to clean the cabinet really good along with the wall behind the cabinet.

I removed the panel below the non opening window next to the door and it looks like there is a ground wire that runs through the wiring. This should make the replacement of the outlets from 2 prong to 3 prong safe and easy.


I did not get as much accomplished as I would have liked. The grass was very long and by the time we borrowed a lawn mower and got it gassed up allot of time was gone. At least I got to go have a Swig at Nigs bar in the Dells with my son who just turned 21!

Friday, July 30, 2010

Found more stuff for the Spartan

Well needless to say I haven't been up to the Spartan in almost a month. Work that pays comes first! The good news is I will be there to try and seal up the holes in the floor this weekend.

I have been in and out of the local Goodwill store and the Restore in Elgin the past couple weeks. I found a few new things this week to go in the Spartan.

The rear bedroom of my Spartan is missing the original nightstands. They were originally in both back corners of the bedroom. Recently someone had two for sale on craigslist for $150.00 but with shipping it most likely would have been costly. I decided to set up the bedroom in the future for maximum capacity. I will set up two twin beds on either end with a night stand in between which I can move if I want to push the beds together for one large bed. I found the night stand at Goodwill this week. The nightstand is a all metal nightstand from the 1950's. The best part is I paid $6.99 for it!

My second great find was a sink that should fit in the bathroom just fine. I found it at the Restore for $25.00 It is a Kohler and brand new. I think the green color will blend well with the pink of the bathroom.
Today I decided to check the price of underlayment at Home Depot and while I was looking around I found insulation on clearance. I figured I would be stuck with R-13 insulation because of price. I found R-19 for $7.16 each bundle. I bought 6 bundles. I'm pretty sure this won't be nearly enough!

Thursday, July 22, 2010

Fabrics for curtains and booth cushions

So I stopped by Joann Fabrics today and look at some of the fabrics for the future curtains and cushions for the booth. Now many great fabrics can be purchased online that may be better then the ones I picked out here.

The curtain fabric here is kinda funky with old motel signs and different cool stuff. I'm not sold on the color of the back ground. This is only $3.99 a yard on sale.


This next fabric has good colors but the theme is not as interesting as the first one but it is the same price.


This one was just added for fun. If I made the curtains from this friends would give me crap forever!

I found a couple options for the cushions on the booth. I think it looks retro. The only issue is the fabric is $34.99 a yard.
Or I can go with the usual vinyl for $12.99 a yard
Leave me a message and let me know what you think!

Sunday, July 18, 2010

Front screen door restoration

So the front screen door was painted silver by a previous owner. I cannot imagine why you would paint a aluminum door silver?!? I started with the usual wood stripper which took most of the paint off and then moved onto the mixture of lacquer thinner and denatured alcohol. It all seemed to come off with a little elbow grease. I purchased new aluminum screen from Menards with new spline. The old stuff was totally trashed, it even smelled as bad as the camper!

Cutting and replacing the screen was fairly easy with just a little blood shed from the sharp ends...yes I know I should wear gloves but I'm a man and chicks dig cuts, oh wait, maybe that's scars.

I used my medium and fine sanding and stripping wheels on the door and it seemed to shine it up a little but not to my satisfaction. I will do the final polish on it when I get to the trailer polishing phase.

Tuesday, July 6, 2010

Starting on the floor

So it's fourth of July weekend. Not exactly a weekend I want to go up for a day because of the traffic on the tollway. After sitting home all day on the 4th watching TV I decided to go up on the 5th to do some work instead of repeating a day of TV.

I bought myself a respirator mask that filters out asbestos and furnace filter from Menards to make a air filter from my box fan. Maybe it will filter some of the stink out!

I washed out the inside of the upper kitchen cabinets with pinesol and water. I couldn't tell if this made a difference since I had the mask on the entire time I was there.


So I tested some of the floor by walking on it. It appears the floor under the side windows are the softest. Some spots are actually so soft you can put your foot right through the floor.


After cutting the 3/4 plywood from the floor with my circular saw it reveals the insulation. You can see the holes in the insulation where little critters made tunnels in the past. I will remove the insulation from these areas as well since removing all the floor and insulation is not a feasible option for me.


The belly pan is fairly complete. There is one spot toward the front that has rotted away and that section of pan is now loose and hanging a bit lower. Perfect "doggie door" for animals big and small to make a home. That needs to be repaired ASAP.


I noticed a drop of water hitting the floor and it was too far away from me to be the sweat poring off me. The light fixture in the dining area had a steady drop of water coming from it. This ceiling panel is scheduled to be removed and discarded anyway so no better time then the present to remove it. I cut the power to the light, removed the screws from the underside of the fixture and carefully took it down. The panel is also held up partially by the decorative room divider which divides the kitchen from the living area. I carefully removed the divider since I want to restore this piece of non painted wood. I removed all the screws from the panel and pulled and tugged and was pelted with mouse pellets until it was down and out the door it went.

The worst part of demolition is the removal of the old insulation. It is falling apart, full of mice droppings and sometimes wet. I am never fully prepared for the job and most of the time have on short sleeves and I am left with itchy arms for days.

Since I spend more time away from the camper then at the camper I wanted to take a few things home with me to restore. I took the room divider and the front screen door this week. I hope to get the screen door finished first so I can reinstall it to keep out the bugs.

Wednesday, June 30, 2010

More great finds at the ReStore!


So the ReStore is a Habitat for Humanity store where people donate things like building materials and furniture to them so they can sell the stuff for the charity.

The place always has different items and sometimes it's a hit and sometimes a miss. I found the pink tile for the bathroom there last week and have been thinking about the other tiles they have and the sale at .25 per tile and kept saying to my self.."hmm .66 for the exact tile I want or .25 for something pretty close" So. while I was out doing my usual real estate work I decided to stop over there today. I went digging through the skids of tile and was looking for colors I could use in the Spartan. I was a bit sad to see the rest off the pink tiles gone except for one lonely piece.


I found a green tile that I think is pretty close to the green in my sample picture and picked up two unopened cases. I found a tan color that is not quite the yellow tan but I think it will do and was able to find two cases of tile loose. I figured the red they had was just not quite right with a speckle of blue in the mix. So off to the cashier I went. On the way to the cashier I found two mid century end tables tucked away under a large dining room table. Will they fit in my car? Let's see if these legs come off. Yup! Good deal, only five bucks each! Total cost with the four cases of tile $62.00


I was loading the car and kept telling myself, those red tiles aren't that bad who is going to notice the little specs of blue in them? After all it's only a accent tile. So back into the store I go to pick through the stack to find fifty unbroken tiles. Total 12 bucks and some change.

The picture to the left is the tile laid out in the pattern on my garage floor. I'm not sold on the tan, I may have to get a yellowish tan instead.


With the potential cost of renovation being the sky's the limit every little bit I can save will bring this project closer to completion.

Monday, June 28, 2010

Some design ideas for the Spartan


I wanted to redo the floor with a old style tile, not a laminate, wood or any modern tile. The best thing I could find was the Armstrong VCT tile you see on the floors of most stores and commercial buildings. The options with these tiles are limitless.


I searched the web for designs knowing the standard checkerboard pattern in most redo's is does not have much of a wow factor. I finally found the design I am going to use throughout the main area and kitchen. The great thing about these tiles is they are only .66 per foot and come in a zillion colors. I will special order them when I get the camper closer to done in the same colors in this picture.


Furniture will be a on going search. The back bedroom originally had one bed. I think my best option will be to furnish it for maximum capacity. I think I will use two beds in the bedroom that can be pushed together if needed to one large bed. For the living room I think I will use two fold down couches opposite each other. I found a great looking mid century fold down at Value City Furniture but it only comes in off white, probably not a good idea when we usually are filthy from riding ATV's all day. So I think I will be stuck with the dark brown couch which is half the price.


< $489.00 or $199.00>


This Spartan did not come with a seating booth originally. I think I will make one that folds down to a bed for a total sleeping capacity of 8.
I was very lucky to find a cool tile for the bathroom in the Spartan. The bath is in sad shape. The walls in the bath are pink and original. The sink and vanity are also original and the sink has a rusted out bottom I hope to fix or replace. The original pink toilet will need to come out since I don't have a septic on the land and the Spartan doesn't have a holding tank. I bought a portable toilet that can be used and emptied at the end of each trip. The floor in the bath is very soft and I will be replacing it at a later date.
Pink tile found at the ReStore in Elgin IL. for .25 each.

Sunday, June 27, 2010

Bringing pieces home

Well I decided since there is allot of work to do and doing all of it in Wisconsin is not feasible I should take work home with me to do in my "spare" time. I started with taking off the kitchen cabinet doors, the drawers in the kitchen and the cabinets in the hall next to the fridge. There are at least two layers of paint on these cabinets with a layer of shellac and a blond wood finish under that.


The smell of these doors is awful, yes I know I keep mentioning the smell but you must understand if this was a smellovision computer you would turn it off and never come back here!


I also took home the dangling light fixture that was hanging from the wall by the wiring. The mouse poop on it had to come off but unfortunately it also took off the brass type finish. What do you think? Should I keep it this way?


So I decided to strip some of the cabinets. I used the spray type cans of stripper from Menards and tried a can from Walmart. Both worked ok but the over spray was brutal. So I decided after the two cans ran out, on just four doors, to go with a large can of paste type stripper from Menards. The paste was the 5 layer at a time stuff that was the strongest available. It seemed to do a good job, at least better then the spray cans did, taking off the paint and shellac. This stripping left some of the blond wood stuff still on the doors. I'm not a fan of blond wood at all so it had to go. I used a 50-50 mix of lacquer thinner and denatured alcohol solvent and a fine steel wool pad to scrub it off. You must go with the grain and NEVER against it or it will leave marks! (Experience speaking here)


I decided the wood would be too light if I did not find a stain so I decided to check out HD and see what they had. Well they don't sell samples so from the little pieces of wood on display I tried to pick out a stain. I took home a small can of $4.99 stain and it looked like crap. I went back and bought a darker shad and it too looked like crap. So I headed over to Menards and found they actually had mini samples for .25! Wow! I grabbed handfuls of colors that I thought might work and decided for a quarter I couldn't go wrong.


My sample board...the one I chose was the traditional pecan which is on the far right.


I also decided to go with a high gloss finish of Hellsman Spar urethane.


After stripping a coat of stain and a coat of poly...


After two coats of poly, cleaned up original knobs and new hinges...

Saturday, June 26, 2010

Running up there for a day.

Well I decided since I can't make it up there for days at a time right now I would just get up there for the day. The leaking roof and the buckets catching the rain is giving me nightmares. I cant help but think when I get there I will open the door and a tilde wave of water will rush out the door at me.

Well there was no tildal wave and barely anything in the catch buckets inside the camper. Time to open her up and play detective with these leaks.


First the roof. It's pretty easy since the entire roof is aluminum and it is riveted together. The main leak was coming from the long sealed roof vent. I was hoping to restore this vent since it is nice to have a place for all the hot air to escape. Upon further review...the roof vent lid is shot. The vents on these old campers are not the standard 14x14 vents on today's campers. These are no longer made. Some genius decided to hammer the crap out of it and pop rivet it to the roof. They then proceeded to tar and feather it unit it was a mound of silver and black gunk.


With a little elbow grease a hammer and a chisel I was able to remove all the gunk, and the pop rivets holding the lid down. I don't think it would seal if I do not reseal the entire cover and make it non-operational.


I decided to seal the vent, the crack and the seams in the roof while I was up there. Since it's not the first time the roof was sealed I decided it wouldn't hurt anything.


Now onto finding that pesky window leak..The rain channel above the window is cut and there is a piece of wire between the channel and the camper. Not sure what this would be for but it appears to be steel wire. For those who know aluminum steel and aluminum react to each other and cause aluminum to corrode. I removed the wire and hmmm....two holes right where the wire was touching. Time to seal those up!


Checking back..the leaks appear sealed. I will seal around the windows with a sealant when I remove the birch paneling and insulation around the windows when I start putting her back together.


I decided I should try to take down the interior panel around the vent to make sure I did not see any light coming in and to remove any moisture that has been collecting there over the years. A couple screws later and wham! Down comes the panel!


After the panel comes down the insulation was mostly intact but I dont think it is very clean or dry. I decided to pull it down in the area of the roof vent. I can see the insulation was a nesting area over the years for mice and I am assuming the rest of the place will need new insulation also. One of the things that attracted me to this Spartan was the original light fixtures. They are all Mid-Century modern and are beautiful!